Nature Photography for Beginners: A Complete Learning Guide
Teaching nature photography to beginners is one of the most rewarding ways to introduce people to both photography and the outdoors. Nature provides an ever-changing classroom filled with light, texture, weather, scale, and emotion. For beginners, success does not come from expensive equipment or complex techniques—it comes from understanding the fundamentals, learning to see creatively, and developing a thoughtful workflow from capture to post-processing.
The Best Nature Photography Investment I Ever Made
A several years ago, I stood in Olympic National Park with a camera in my hands and came home disappointed. The scene was incredible. The light was beautiful. But my photos didn’t reflect what I felt standing there.
I returned to the same locations in 10 years later. Same park. Same camera system (Upgraded Body with same lenses). The difference? Skills. Knowledge. Education.
The before-and-after images from Olympic National Park are proof that photography isn’t about owning better gear—it’s about knowing how to see, how to work with light, how to simplify a composition, and how to make intentional choices in the field.
-

Hoh Rainforest in 2001, Olympic National Park
-

Lake Crescent, 2001, Olympic National Park
-
Marymere Falls in 2001, Olympic National Park
-

Hoh Rainforest in 2010, Olympic National Park
-

Lake Crescent in 2010, Olympic National Park
-

Marymere Falls, Olympic National Park
Cameras will change. Technology will improve. But once you learn how to control light, exposure, composition, and mood, those skills stay with you forever—and they apply to every camera you’ll ever own.
This in-depth guide explores how to teach nature photography to beginners by building strong technical foundations, encouraging creative thinking, and developing effective post-processing skills. By simplifying complex concepts and introducing new ideas at the right time, beginners can grow confidently and consistently.
#1: How Beginners Should Learn Nature Photography From the Start
One of the most important decisions when teaching beginners is to skip auto mode entirely. In fact, it doesn’t even need to be mentioned. Photography fundamentals are far easier to understand than most people expect—even children can grasp them.
Auto mode removes creative control and prevents beginners from learning how light actually works. When students take control of their camera from the beginning, they develop confidence and understanding much faster. Nature photography is about making intentional choices, not letting the camera guess.
Understanding Exposure: Aperture, Shutter Speed, and ISO Explained Simply
Exposure is the foundation of all photography, and it can be explained in very simple language. A helpful analogy is to describe a window inside the camera.
Together, they control how much light reaches the camera’s sensor.
If a photo is too dark, more light needs to enter the camera. That can be done in two ways:
- Open the aperture wider
- Leave the shutter open longer
The key teaching moment is asking beginners which option makes sense for the scene they are photographing.
For example:
- A flowing waterfall may benefit from a longer shutter speed
- A moving leaf or animal may require a faster shutter speed
- A subject that needs separation from the background may benefit from a wider aperture
By connecting exposure choices to visual results, beginners quickly understand how aperture and shutter speed affect their images.
Introducing the Histogram Without Intimidation
The histogram often scares beginners, but it is simply a bar graph that shows how light is distributed in an image.
- Left side represents shadows
- Middle represents midtones
- Right side represents highlights
 by Jay Patel")
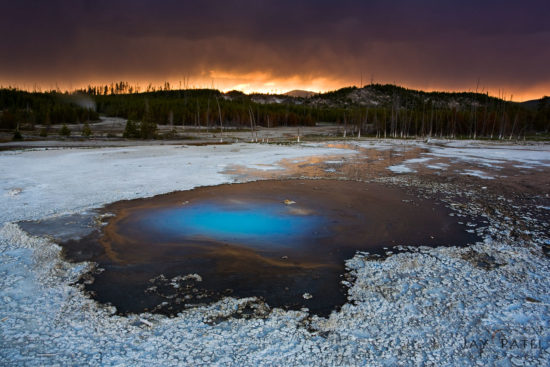
Extreme dynamic range requires beginner photographers to keep a close eye the histogram – Lower Geyser Basin, Yellowstone National Park Wyoming (WY) by Jay Patel
Teaching beginners to check the histogram after each image helps them understand exposure far more accurately than relying on the camera’s screen alone. This is especially useful in nature photography, where bright skies or dark foregrounds can mislead the camera’s meter.
Once beginners understand the histogram, they gain immediate feedback and can correct exposure issues on location.
Explaining ISO at the Right Time
ISO does not need to be introduced right away. It naturally enters the conversation when beginners realize they cannot achieve the exposure they want using only aperture and shutter speed.
ISO controls how sensitive the camera’s sensor is to light:
- Lower ISO produces cleaner images with less noise
- Higher ISO brightens images but introduces more noise
In nature photography, beginners are encouraged to use the lowest ISO possible. However, when light levels are low and creative choices are limited, increasing ISO becomes a practical solution. Introducing ISO as a problem-solver rather than a default setting helps beginners use it responsibly.
Controlling Focus for Sharp Nature Images
Sharp focus is essential in nature photography. Beginners should be taught how to:
- Select a single focus point
- Understand how depth of field works
- Choose when to use autofocus or manual focus
Exercises that focus on foreground subjects, textures, or distant elements help beginners understand how focus placement affects visual impact. Learning focus control early prevents frustration and builds technical confidence.
, USA by Jay Patel")
Capturing natural light and colors at Halona Beach Cove, Oahu, Hawaii (HI), USA by Jay Patel
Working With Natural Light
Light is the most important element in photography. Beginners should learn to observe:
- Direction of light
- Quality of light (soft vs harsh)
- How light changes throughout the day
- How weather influences mood and texture
Nature photography teaches patience. Early morning and late evening light often produce the most compelling images, and learning to work with natural light helps beginners develop stronger observational skills.
Research and Planning for Better Results
Successful nature photography rarely happens by accident. Teaching beginners how to plan improves consistency and confidence.
Planning includes:
- Studying locations
- Tracking sunrise and sunset times
- Watching weather patterns
- Understanding seasonal changes
Good research allows beginners to arrive with intention and focus on creativity rather than scrambling for compositions.
#2: Using Filters and Lenses to Expand Creative Control
Once beginners understand basic exposure, filters and lenses become valuable tools for shaping light, mood, and perspective. Rather than fixing problems later, these tools encourage intentional shooting and help photographers make better decisions in the field.
Filters for Light Control
Photography filters are powerful tools once beginners understand basic exposure. Filters modify light before it reaches the camera sensor, making them especially useful in changing outdoor conditions.
- Polarizing filters reduce glare on water and foliage, deepen skies, and enhance contrast.
- Neutral density filters reduce light to allow longer shutter speeds, ideal for motion in water or clouds.
- Graduated neutral density filters help balance bright skies with darker foregrounds.
Teaching when and why to use filters helps beginners slow down and think about light before pressing the shutter.
, USA by Jay Patel")
Macro photography lens used to capture this nature photo at Pebble Beach, Califorina (CA), USA by Jay Patel
Lenses and Creative Perspective
Different lenses change how a scene is perceived and help beginners learn to see creatively.
By understanding how filters control light and how lenses shape perspective, beginners move beyond settings and start photographing with intention.
#3: How Beginners Develop Creativity in Nature Photography
Creating Impact Through Composition
Composition is where photography becomes expressive. Beginners should be introduced to foundational principles such as:
- Leading lines
- Foreground interest
- Balance and visual flow
- Subject placement
Rather than memorizing rules, beginners should be encouraged to ask:
What is my subject, and how am I guiding the viewer’s eye to it?
This mindset shifts composition from rule-following to purposeful design.
Understanding Visual Flow and Point of Interest
Strong images guide the viewer’s eye naturally. Beginners should learn to identify:
- The primary subject
- Supporting elements
- Visual distractions
If the viewer’s eye wanders without direction, the image loses impact. Teaching visual flow helps beginners create images that feel intentional and engaging.

Practicing minimalism using ND Filters – Sunset at Mana Island, Fiji by Jay Patel
Simplification: One of the Most Important Creative Skills
Nature scenes are often chaotic, and beginners tend to include too much. Simplification is one of the most valuable lessons in nature photography.
This can be achieved by:
- Changing camera position
- Using aperture to isolate subjects
- Removing distracting elements
- Waiting for better light or conditions
Simplified compositions are easier to read, more emotionally powerful, and more visually pleasing.
Creative Problem Solving and Thinking Differently
Creativity grows when beginners are encouraged to experiment. Not every problem requires a technical fix—sometimes it requires a new perspective.
Encourage beginners to:
- Look for smaller scenes instead of grand vistas
- Focus on textures, patterns, and details
- Use weather, shadows, and reflections creatively
This approach helps beginners see challenges as opportunities rather than obstacles.
Landscape photography from Pearl Spring, Yellowstone National Park, Wyoming by Jay Patel
#4: Post-Processing: Completing the Creative Vision
Mastering RAW Processing
Post-processing begins with understanding RAW files. RAW images contain significantly more information than JPEGs and allow greater flexibility.
Basic RAW processing includes:
- Adjusting exposure and contrast
- Recovering highlights and shadows
- Fine-tuning white balance
- Enhancing texture and detail
Teaching moderation is critical. Post-processing should enhance what was captured, not overpower it.

Photoshop Layers & Mask Example by Varina Patel
Advanced Editing With Layers and Masks
As beginners progress, Photoshop layers and masks become essential tools.
Layers allow photographers to:
- Make non-destructive adjustments
- Experiment without damaging the original image
Masks enable selective editing, which is especially important in nature photography where different areas often need different treatments. Teaching layers and masks gives beginners precise control over tonal contrast, light balance, and visual emphasis.
Building a Consistent Post-Processing Workflow
A workflow is a repeatable process that takes an image from capture to final output. Teaching beginners to develop a workflow helps them:
- Stay organized
- Edit more efficiently
- Achieve consistent results
A strong workflow reinforces intentional decision-making and long-term growth.

Organizing Photos using Keywords and Folders in Adobe Bridge by Varina Patel
Organizing and Protecting Your Images
Photography is a long-term pursuit. Beginners should be taught how to:
- Organize files logically
- Use keywords for easy searching
- Back up images reliably
Good organization ensures that images remain accessible and protected as a portfolio grows.
Introducing Concepts at the Right Time
One of the most important principles when teaching beginners is timing. New concepts should be introduced when they solve a real problem the photographer is facing.
Whether it’s ISO, filters, composition techniques, or advanced post-processing, learning is most effective when it feels relevant and practical. This approach prevents overwhelm and keeps beginners motivated.
Conclusion: Building Confidence Through Understanding
Teaching nature photography to beginners is about more than camera settings. It’s about helping people see the world differently and giving them the tools to express what they feel in nature.
By focusing on manual control, simple explanations of exposure, thoughtful composition, and purposeful post-processing, beginners gain skills that grow with them. Nature photography rewards patience, observation, and curiosity—and with the right guidance, beginners quickly discover that photography is not complicated, but deeply rewarding.
Strong foundations lead to confident photographers, and confident photographers create meaningful images.
 Like
0
Like
0
 Dislike
0
Dislike
0
 Love
0
Love
0
 Funny
0
Funny
0
 Wow
0
Wow
0
 Sad
0
Sad
0
 Angry
0
Angry
0


Comments (0)